Resonance Structures & the Curly Arrow
Introduction
We have discussed the importance of delocalization and resonance structures. You saw that each resonance structure showed a different allowable Lewis structure for the molecule. In introductory organic chemistry courses, you will find many questions asking you to draw alternative resonance structures. Answering such questions is painfully slow if you start each Lewis structure from scratch. A much faster process involves showing the ‘movement’ (although this word is horribly inaccurate, and misleading) of electrons between resonance structures. Organic chemists have create a tool that helps determine where electrons will ‘move’, and this is known as the curly arrow (or the curved arrow notation).
Curly arrows are a chemists best friend (and many students worst nightmare) as they are a powerful predictive tool. You will meet them in discussions of delocalization/resonance and reactions. Grasp how to use curly arrows and organic chemistry becomes much easier (and dare we say ‘fun’ as it is no longer about memorizing reactions but problem solving).
The Curly Arrow
It is commonly stated that a curly arrow shows the movement of two electrons. In terms of delocalization/resonance this is not true, the curly arrows are connecting resonance structures (drawings) by showing which electrons electrons will change position in the next picture (remember, resonance structures aren’t ‘real’, it’s the resonance hybrid that depicts the ‘real’ molecule).
What does a (resonance) curly arrow show?
A curly arrow depicts two electrons, either a bond or a lone pair of electrons, ‘moving’ between drawings. The tail of the curly arrow starts were the electrons are found in the first structure. The tail tells you which electrons are going to change position. The head of the arrow points to where the electrons will be in the second structure. It shows you how to draw the second structure (the one after the resonance arrow).
It is important that you draw the arrows accurately. Make sure the tail is either an atom with a lone pair of electrons or the middle of a π (double/triple) bond. The head must be drawn in the correct place. If the electrons become a new π bond then the arrow must point to the existing σ bond. If the electrons will become a lone pair of electrons then the arrow must point to the atom. Don’t be sloppy, it will lead to mistakes and confusion (or worse, lost marks).
The only way to learn how to use curly arrows is through practice …
Example 1
Below are two resonance structures. Where do we draw the curly arrow that connects the left-hand diagram (the first structure) to the right-hand structure?

Add a curly arrow to connect the left-hand resonance structure with the right-hand resonance structure.
First, identify which electrons are being redistributed. The tail of the curly arrow starts on the electrons that change position. As the double bond moves, the tail of the curly arrow must start with the electrons of the π bond or, as the two electrons are shared between two atoms, it starts halfway along the bond. The head of the curly arrow shows where the electrons will be drawn in the second structure. The second drawing has a double bond between the left-hand carbon atoms, so the curly arrow shows that a new bond will be placed on the σ bond.
Note the change in the position of the formal charge. The terminal carbon of the first structure has only six valence electrons. On the structure on the right the terminal carbon is now sharing two additional electrons to form the double bond. It no longer has a formal charge. The other carbon has lost its share of two electrons from the double bond as it is redistributed to the end of the molecule. It now has six valence electrons and a formal charge. All this is shown by the curly arrow below (in chemistry, a diagram really is worth a thousand words):

The curly arrow connecting the two resonance structures of an allyl cation
Example 2
Let’s repeat the process. Practice makes perfect even in a summary! Draw the curly arrows that connect the left-hand drawing to the right-hand structure. This one needs more than one arrow.

Add curly arrows to connect the left-hand resonance structure with the right-hand resonance structure
The process is the same as before and you should start by identifying changes between the two resonance structures. On the left-hand side, the carbon atom with a formal negative charge has a lone pair of electrons. These are going to be shared with the adjacent carbon to give a π bond on the right-hand side drawing. When this occurs, the carbonyl C=O double bond is broken and the two electrons of the π bond become the third lone pair of electrons on the oxygen atom of the second drawing.
To show this change, the tail of the first curly arrow starts with lone pair of electrons of the negative charge on the carbon atom. The head of this curly arrow is placed halfway between the two carbon atoms to show where the new π bond will be drawn. The second arrow starts on the π bond of the carbonyl and its head goes to the oxygen atom.
Note that the curly arrows flow in one direction. This will be a common motif for all curly arrows. They are always shown flowing from high electron density, areas with ‘excess’ electrons, such as a negative charge, to areas of low electron density or electronegative atoms.
We have draw the answer twice. The top version is an experienced chemist’s drawing, while the bottom version shows the lone pairs of electrons to make it easier to follow the changes:
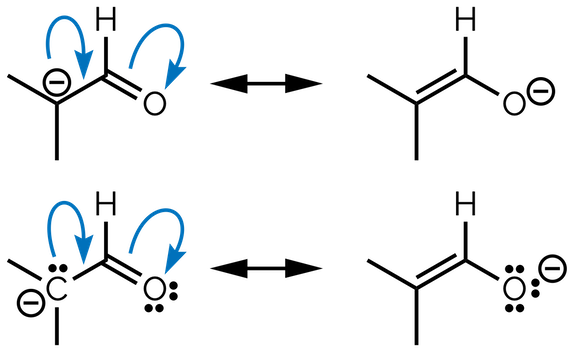
The curly arrow connecting these two resonance structures
It is important to remember that a resonance arrow, the double headed horizontal arrow ⟷, connects resonance structures. Resonance structures are different representations of the same molecule. They are effectively snapshots of a single molecule and the real thing is better represented as a resonance hybrid. Why is this important? It means that the curly arrows are not representing the movement of electrons, they are a tool that allows you to quickly draw multiple resonance structures. When you meet reactions, the curly arrow will show the movement of electrons.
Rules for resonance curly arrows
There are a number of rules that will help you draw the correct resonance curly arrows:
The curly arrow must start from two electrons (either a π bond or a lone pair of electrons)
2. The head of the arrow must finish on either a σ bond (to form a new π bond) or on an atom (to give a new lone pair)
3. You cannot exceed the octet rule (for the elements of the 2nd row)

4. You cannot make or break σ bonds when describing resonance (this would be a reaction)

5. The overall charge of the molecule does not change - make sure formal charges are correct (read the formal charge summary if you have forgotten)

6. Never skip an atom. Lone pairs of electrons are only shared with an adjacent atom while the electrons of a bond will always be associate with one atom from the original bond.

Three ‘types’ of curly arrow
These rules result in there being three ‘types’ of curly arrow when dealing with resonance:
Type 1 - Bond to lone pair

Type 2 - Lone pair to bond

Type 3 - Bond to bond

Let’s take all of this and look at some more examples …
Example 3
Draw the curly arrows connecting these resonance structures:

Add curly arrows to connect each of these resonance structures (moving left to right)
Where do you start? Look for an area of high electron density (most electron rich). Frequently, this will either be an atom with a formal negative charge or lone pairs of electrons. Here it is the oxygen atom. The tail of a curly arrow will start on a lone pair of electrons (or, in our minimal skeletal diagrams, the formal charge). The next drawing (middle resonance structure) shows a new C=O double bond. This means the lone pair of electrons will be shared between the atoms so the head of the curly arrow must point to the bond connecting the atoms. This is a Type 2 arrow - lone pair to bond. If we left the drawing at this point carbon atom of the carbonyl group would have 5 bonds or 10 valence electrons. This is unacceptable. There must be a second curly arrow that takes electrons away from this carbon. This arrow starts in the middle of the double bond and its head moves to the carbon atom at the bottom of the ring. This shows the double bond becoming a lone pair of electrons that give the carbon atoms a negative formal charge. This is a Type 1 curly arrow. You can see why chemists invented these arrows, this horribly wordy paragraph can be summarized by the two arrows below. Now isn’t that clearer and easier?
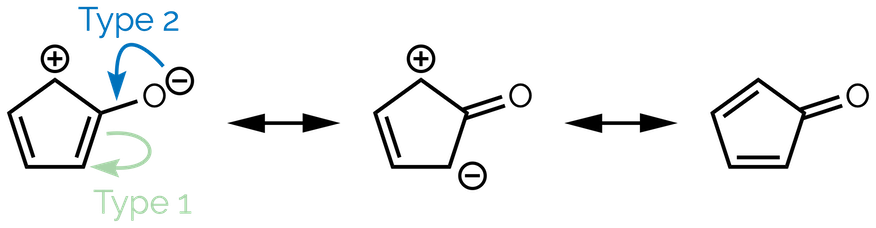
The curly arrows connecting the first resonance structure to the middle structure
You can follow the same process to connect the next two resonance structures. The tail of the first arrow starts with the lone pair of electrons on the carbon with a formal charge, the head points to the adjacent bond. This is a Type 2, lone pair to bond curly arrow. To prevent the adjacent carbon atom from having 5 bonds (don’t forget the C–H bond not shown in skeletal representations), the double bond shifts towards the formal positive charge. The tail of arrow starts with the electrons of the π bond. Its head will go to halfway between the next two atoms to form the new π bond. This is a Type 3 bond to bond curly arrow. You have now linked all the structures.
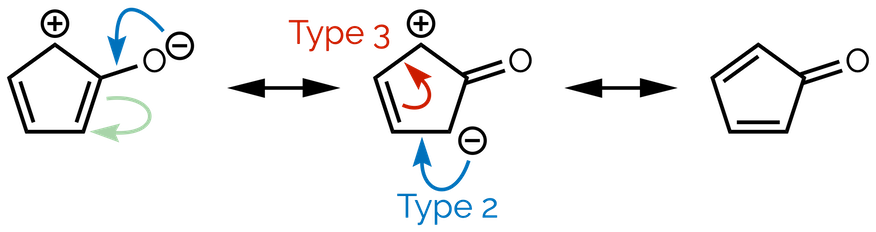
The curly arrows connecting the second two resonance structures
A good check that you have drawn the curly arrows correctly is to look at the overall charge of each resonance structure. The charge can’t change as each drawing is a snapshot of the same molecule. Thus the formal charges must always combine to give the same charge. In this example, each resonance structure is neutral overall.
Example 4
Off come the stabilizers! This question is more challenging as we now want you to use the curly arrows to determine the possible resonance structures of the following molecule:

Use curly arrows to help determine other resonance structures
The process is the same as before but you need an ‘in’, somewhere to start. As always, the tail of the first arrow must start with a pair of electrons. This could be a lone pair of electrons or a bond. Students at the start of their careers tend to choose the double bond option. Double bonds are obvious while lone pairs of electrons are generally left off diagram. This is fine. It will produce an allowable resonance structure, and we will show this first.
Which double bond should we start from and does it matter? No it doesn’t. What matters is which way the electrons flow. They must flow towards the most electronegative element, which is the oxygen atom. The redistribution of electrons will result in formal charges and these cancel out as the molecule is neutral. One possibility is shown below:
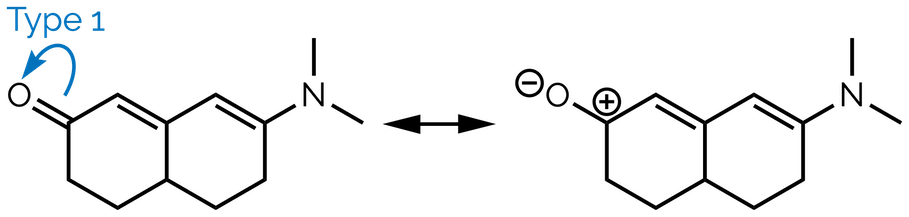
A potential answer - a less important resonance structure
Starting with the carbonyl π bond, the electrons can flow towards the electronegative oxygen. The new resonance structure plays little contribution to the resonance hybrid. Remember, resonance structures can be ranked ( see the first resonance summary sheet), and the rankings favor resonance structures where all atoms have a full valence shell. Here the carbon atom doesn’t. Additionally, resonance structures that have formal charges on adjacent atoms are less important than those that spread out the formal charges. From the second drawing, it is possible to draw a more favorable resonance structure by using a Type 3, bond to bond, curly arrow to shift a C=C double bond.

A second resonance structure - more favorable as the formal charges are separated
The next resonance structure (above) makes a greater contribution to the resonance hybrid than the first (left-hand side). There is still the issue of one atom having six valence electrons but at least the formal charges are separated.
We can repeat the process with another Type 3 curly arrow and put the formal adjacent to the nitrogen. This is slightly more important than the previous two resonance structures as the formal charges are further apart. The most important resonance structure, after the original drawing which had no formal charges, is formed by a Type 2, lone pair to bond, curly arrow. This has the formal positive charge on the nitrogen. All atoms have full valence shells once more, and the formal charges are as far apart as they can be.

Two more resonance structures, including the second largest contributor to the resonance hybrid (far right-hand side)
The third resonance structure (right-hand side) above is the favored resonance structure. Chemists would draw this structure first. The lone pair electrons on the nitrogen can be pushed away to form the double bond and flow towards the oxygen as shown below. Chemists invariably start from lone pairs of electrons rather than double bonds. Simplistically, sharing a lone pair between two atoms (forming a bond in other words) is energetically favorable opposed to breaking a bond and creating a new lone pair. Using the lone pair also maintains full valence shells.

The best answer
The lone pairs of electrons on oxygen cannot be delocalized as they are not conjugated. Moving them to create a triple bond would result in carbon atom with five bonds or ten valence electrons or require a σ bond to break. The latter would be a reaction and not resonance/delocalization.
The diagram below shows the other allowable resonance structures:

Some of the many resonance structures - not all of them play any meaningful contribution to the resonance hybrid
Conclusion
Resonance structures, resonance hybrids and the delocalization of electrons are important concepts that will be used throughout chemistry. It is important that you can identify when delocalization is possible and that you can draw the various resonance structures. The guidelines given above are a good starting point and will help you determine each resonance structure. With practice, you will start to recognize common motifs and these guidelines will be less important to you.
Equally important, is the introduction of the curly arrow. Here it is used to connect allowable Lewis structures. It is used to show how the electrons can be distributed throughout a molecule. Curly arrows will be extremely useful when we start to look at chemical reactions. Many of guidelines above will apply to curly arrows describing reactions. Learning to use curly arrows is an important skill.
As mentioned, the only way to become comfortable with resonance and the curly arrow is through practice so HERE are some practice questions.